Create Elastic Public IP
The PUBLIC-IP template is used to create three new elastic public IP addresses.
It is not mandatory to create new resources, the existing resources can be used in deployment and configuration.
Before deploying this template, it is recommended to review the Prerequisites.
To create Elastic Public IP, perform the following steps:
-
Download A10-vThunder_CFT-TEMPLATES > PUBLIC-IP template from GitHub.
-
From the AWS Management Console, navigate to CloudFormation > Stacks > Create Stack > With new resources (standard).
The Create stack window is displayed.
Figure 52 : Create stack window

-
In the Prerequisite - Prepare template section, select Choose an existing template.
After selecting this option, the Specify template section is displayed.
-
In the Specify template section, select Upload a template file and click Choose file to browse and upload the following template file from the downloaded CFT folder:
CFT_TMPL_ELASTIC_PUBLIC_IP.jsonThe selected template file name is displayed as the chosen file.
- Click Next.
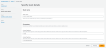
The Specify stack details window is displayed.
Figure 53 : Specify stack details window
-
In the Specify stack details window, enter or select the following:
Table 31 : JSON Parameters Resource Name
Description
Stack name
Specify a stack name containing letters (A-Z and a-z), numbers (0-9), and dashes (-).
Here, the stack name is provided as
eip.CustomTagName
Specify the custom tag name. The custom tag key is added to all the resources created using the CFT template. This tag is used to track the cost of resources in the AWS Cost Explorer.
CustomTagValue
Specify the custom tag value. The custom tag key is added to all the resources created using the CFT template. This tag is used to track the cost of resources in the AWS Cost Explorer.
The default custom tag value is a10-vthunder-adc.
-
Click Next.
The Configure stack options window is displayed.
- Verify the other fields and change the values appropriately. (Optional)
-
Click Next.
The Review <stack_name> window is displayed.
- Verify if all the stack configurations are correct and then click Submit.
NOTE: The system may take a few minutes to create the resources and display the stack status as CREATE_COMPLETE. -
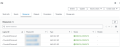
Verify if the elastic IPs are created in the AWS Management Console > CloudFormation > Stacks > <stack_name> > Resources tab.
Figure 54 : Resource listing