Azure Service Application Access Key
The Azure service application access key is required to access the Azure resources. You can either use an existing Azure service application access key or create a new key. For more information, see Create a new Azure Access Key.
To upload the Azure service application access key, perform the following:
If you want to delete any existing Azure Access Key, see Delete an Azure Access Key.
To collect the Azure access keys from Azure Portal, perform the following steps:
-
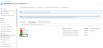
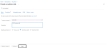
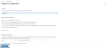
From Azure Portal, navigate to Azure services > Azure Active Directory > App registrations.
Figure 161 : Azure Active Directory - App registrations window
- If you are the owner of the required service application, the required service application would be listed under the Owned applications tab. If not, perform the below steps with Administrator privileges:
- Select Owners from the left Manage panel.
The Owners window appears. - Select Add to get a list of user accounts.
- Search and select your user account.
- Click Select to add the user account to your owned application.
- Select Owners from the left Manage panel.
-
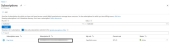
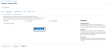
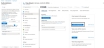
Select your service application from the list of applications.
The selected service application window is displayed.Figure 162 : Selected Service application window

-
Copy the Client ID, Tenant ID from the service application window.
client_id= 'cc4c86xx-65b3-48xx-a3xx-610cxxxxxxxx’tenant_id= '91d27axx-8cxx-41xx-82xx-3d1bxxxxxxxx' -
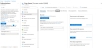
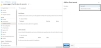
Navigate to the Home > Subscriptions > Registered Subscription Name, and copy subscription ID value.
Figure 163 : Subscriptions window
-
Create a text file having subscription, client_id, client_secret, and tenant_id information as shown below:
subscription='07d34bxx-61xx-47xx-abxx-006bxxxxxxxx'client_id='cc4c86xx-65xx-48xx-a3xx-610cxxxxxxxx’client_secret='G0x_hVDzZxxxx-o1Vsw.xxxx.Zxxxx-xx'tenant_id='91d2xxxx-8xxe-41xx-82xx-3d1bxxxxxxxx’ -
Save this text file.


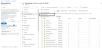
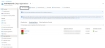
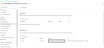
To upload the Azure access key text file to the appropriate server machine, login to the server using any FTP tool and upload them.
Figure 164 : Upload Azure access key file

Each vThunder instance requires a copy of the Azure Access key and so it should be imported using the file transfer protocol methods.
To import the Azure access key, perform the following steps:
- Log in to the vThunder instance.
-
Go to the config mode.
vThunder>enablePassword:
vThunder#config -
Go to the admin mode.
vThunder(config)#admin ?admin
NAME<length:1-31> System admin user name
vThunder(config)#admin admin -
Import the Azure Access key by using any of the file transfer methods recommended.
vThunder(config-admin:admin)#azure-cred import use-mgmt-port ?tftp: Remote file path of tftp: file system(Format: tftp://host/file)
ftp: Remote file path of ftp: file system(Format:
ftp://[user@]host[:port]/file)
scp: Remote file path of scp: file system(Format:
scp://[user@]host/file)
sftp: Remote file path of sftp: file system(Format:
sftp://[user@]host/file)
For example
vThunder-Active(config)(NOLICENSE)#admin adminvThunder-Active(config-admin:admin)(NOLICENSE)#azure-cred import use-mgmt-port scp://username@<ip-addr>:/<file-path>/cred.txtHere, the
usernameis the server username,ip-addris the Public Management IP address of the server, andfile-pathis the path where the Azure access key file is uploaded on the server. -
Verify the imported Azure Access key file content using the following command:
vThunder-Active(config-admin:admin)(NOLICENSE)#azure-cred showsubscription='07d34bxx-61xx-47xx-abxx-006bxxxxxxxx'client_id='cc4c86xx-65xx-48xx-a3xx-610cxxxxxxxx’client_secret='G0x_hVDzZxxxx-o1Vsw.xxxx.Zxxxx-xx'tenant_id='91d2xxxx-8xxe-41xx-82xx-3d1bxxxxxxxx’
To create a new Azure service application access key, perform the following steps with Administrator privileges:
- Create a Role
- Register a Service Application
- Associate Service Application with a Role
- Create Certificate and Secrets
Create a Role
To create a custom role, perform the following steps:
-
From Home, navigate to Azure services > Subscriptions > <subscription_name>.
The selected Subscription - Overview window is displayed. Here, the subscription is Eng Azure.Figure 165 : Subscriptions - Overview window

- Click Access control (IAM) from left panel.
The selected Subscription - Access control (IAM) window is displayed. -
Select the Roles tab.
The Roles window is displayed.Figure 166 : Access Control - Role Window
-
Click Add to select Add custom role option.
The Create a custom role window is displayed.Figure 167 : Add custom role window
-
In the Basics tab, enter or select the following:
- Customer role name
- Description (optional)
- Baseline permission
Figure 168 : Create a custom role window
-
Click Next at the bottom of the window.
The Permissions window is displayed.Figure 169 : Permission window
- Click Add Permissions to add permissions to the custom role.
The Add Permissions window is displayed.
Figure 170 : Add permissions window

- Search the following permission groups in the Add Permissions window, select the corresponding permissions listed in the List of Custom Role Permissions, and then click Add:
- Microsoft Automation
- Microsoft Operational Insights
- Microsoft Compute
- Microsoft Network
- Click Review + create at the bottom of the window to skip the other tabs.
The Create a custom role confirmation window is displayed.
- Click OK to successfully create the custom role with permissions.


Figure 171 : Microsoft Network permissions window

The selected permissions are listed under Create a custom role > Permissions tab.

| NOTE: | It may take the system a few minutes to display your role everywhere. |
Register a Service Application
To register a service application, perform the following steps:
-
From Home, navigate to Azure services > Azure Active Directory option.
Figure 172 : Azure Active Directory window

-
On the Azure Active Directory window, click App registrations menu option from the left Manage panel.
The App registration window to register an application is displayed.Figure 173 : App registrations window
-
Click New registration.
The Register an application window is displayed.Figure 174 : Register an application window
-
Enter the Name of the application. For example, acos-sapp.
-
Click Register to register the application. The application gets listed under Azure Active Directory - Apps registrations window.


Associate Service Application with a Role
To associate service application with a role, perform the following steps:
-
From Home, navigate to Azure services > Subscriptions > <subscription_name>.
The selected Subscription - Overview window is displayed. Here, the subscription is Eng Azure. -
Click Access control (IAM) from left panel.
The selected Subscription - Access control (IAM) window is displayed.Figure 175 : Subscription - Access control (IAM) window
-
To assign a role to the above scope, click Add from the main menu options.
The Add role assignment window is displayed.Figure 176 : Add a role assignment -1

-
Select a Role from the drop-down list. For example, acos-role.
-
Select the required Assign access to option from the drop-down list.
- Search and select your service application. For example, acos-sapp.
-
Click the Save button to save the configuration.


Create Certificate and Secrets
To create certificate and secrets for the assigned role, perform the following steps:
-
From Home, navigate to Azure services > Azure Active Directory option.
Figure 177 : Azure Active Directory - Overview window

-
On the Azure Active Directory - Overview window, click App registrations menu option from the left panel.
The App registration window with a registered application(s) is displayed.Figure 178 : App registrations - Overall applications window

-
Select the service application from the list of applications.
The selected service application window is displayed. -
Select the Certificates & secrets option from the left Manage navigation pane.
The <service_application> - Certificates & secrets window is displayed. - Browse and upload certificates.
-
Select the Start date and Expires date from the date picker or click the New client secret button.
The Add a client secret window is displayed.Figure 179 : Add a client secret window
-
Enter the New client secret Description and Expires value.
The entered value is displayed on the <service_application> Certificates & secrets window.Figure 180 : acos-sapp Certificates & secrets window
NOTE: Save the new client secret value in a text file, as it is not visible once the window is refreshed.


To delete the Azure access key, use the following command:
vThunder-Active(config-admin:admin)(NOLICENSE)#azure-cred delete