Create Thunder Virtual Machines
The A10-vThunder-3NIC-VMSS template is used to create multiple Thunder virtual machines with three network interface cards. This template is deployed using Azure CLI.
Before deploying this template, it is recommended to review the Prerequisites.
To deploy the A10-vThunder-3NIC-VMSS template using Azure CLI commands, perform the following steps:
-
Download A10-vThunder-3NIC-VMSS template.
NOTE: This template contains pre-populated default values that can be modified as required and it does not create new virtual network, network security group, subnets, and Public IP. - From Windows Explorer, navigate to the folder where you have downloaded the PowerShell template.
- Open the PS_TMPL_3NIC_NVM_VMSS_PARAM.json with a text editor.
-
Configure the following parameters as appropriate:
Table 6 : JSON Parameters Resource Name
Description
vThunder credentials
Enter the default admin credentials to provision the vThunder instance. Once the device is provisioned, vThunder auto-deletes all the users except the default user.
 "adminUsername": {
      "value": "vth-user"
    },
 "adminPassword": {
      "value": "vth-Password"
    },
Virtual Machine Scale Set Name
Specify a name for the Virtual Machine Scale Set (VMSS). The VMSS automatically scale-out or scale-in based on the specified capacity rules. It manages a group of identical virtual machines efficiently. For more information, see Virtual Machine Scale Set.
 "vmssName":{
        "value":"vth-vmss"
     },
Virtual Machine Scale Set Size
Specify a suitable VM size that supports at least 3 NICs for the vThunder instance. For VM sizes, ssee Supported VM Sizes.
 "vmssSku":{
        "value":"Standard_D8s_v3"
     },
Instance count Specify the number of virtual machines to be created with identical configuration inside VMSS. It allows to adjust the number of instances based on changing workload demands. For more information, see Virtual Machine Scale Set.
 "instanceCount":{
        "value":1
     },
vThunder Image
Specify the desired vThunder Image name and Product name from the Azure Marketplace.
 "vThunderImage":{
        "value":"a10-vthunder-adc-601-byol"
     },
"publisherName":{ "value":"a10networks" },"productName":{ "value":"a10-vthunder-adc-521" },NOTE: Do not change the publisher name. Subnet CIDR
Specify the CIDR range for management, datain, and datout subnets.
 "mgmtIntfPrivatePrefix":{
        "value":"10.0.1.0/24"
     },
 "eth1PrivatePrefix":{
        "value":"10.0.2.0/24"
     },
 "eth2PrivatePrefix":{
        "value":"10.0.3.0/24"
     },
Network Interface Cards
Specify a unique network interface card for management, datain, and dataout traffic.
 "nic1Name":{
        "value":"vth-inst-mgmt-nic"
     },
 "nic2Name":{
        "value":"vth-inst-datain-nic"
     },
 "nic3Name":{
        "value":"vth-inst-dataout-nic"
     },
Management Public IP
Specify an existing Public IP address for management traffic.
 "nic1PublicIPName":{
        "value":"vth-inst-mgmt-ip"
     },
Network Security Group
Specify the network security group name for all the NICs.
 "networkSecurityGroupName":{
        "value":"vth-vmss-nsg"
     },
Storage Account
Specify a unique name for the Azure storage account. The name must be in lowercase, 3 - 24 characters long, and can contain numbers and lowercase letters only. It is used as a part of the URL for accessing the data stored within the account. If a name is not provided, the default value is used, but it is recommended to change it to a unique and meaningful name. For more information on naming rules and considerations, see Resource name rules.
 "storageAccountName": {
        "value": "vthunderstorage"
     },
Load Balancer
Specify a unique name for the Azure load balancer. The name must be globally unique within the Azure subscription and 1 - 80 characters long. It can include numbers, lowercase letters, and hyphens, but cannot start or end with a hyphen. The Load Balancer name is used to identify and access the load balancer and its associated resources. If a name is not provided, the default value is used.
 "lbName": {
        "value": "vth-lb"
     },
 "lbPubIPName": {
        "value": "vth-lb-ip"
     },
Automation Account
Specify a unique name for the Azure automation account. The name must 2 - 50 characters long and can contain numbers, lowercase letters, and hyphens, but cannot start or end with a hyphen. If a name is not provided, the default value is used. An Azure automation account is a central hub for automating and orchestrating tasks and processes within the Azure environment and beyond. It provides a platform to create, monitor, and manage automation runbooks, which are scripts that can perform various tasks on Azure resources and external systems. Automation runbooks can be scheduled to run at specific intervals or triggered by specific events, enabling proactive maintenance and resource management.
 "automationAccountName":{
      "value": "vth-amt-acc"
     },
Log Analytics Workspace
Specify a unique name for the Azure log analytics workspace. The name must be 2 - 64 characters long, can contain numbers, lowercase letters, and hyphens, but cannot start or end with a hyphen. If a name is not provided, the default value is used. An Azure log analytics workspace is a central repository for collecting, analyzing, and visualizing data from various sources. It allows you to ingest and store logs and monitoring data from Azure resources, on-premises servers, applications, and other cloud environments. Once data is collected in the workspace, you can perform queries, create custom dashboards, and set up alerts to gain valuable insights into the performance, health, and security of your infrastructure and applications.
 "logAnalyticsWorkspaceName": {
      "value": "vth-vmss-log-workspace"
Application Insights
Specify a unique name for the Azure application insights resource. The name must be 2 - 256 characters long, can contain numbers, lowercase letters, and hyphens, but cannot start or end with a hyphen. If a name is not provided, the default value is used. Azure application insights is a comprehensive application performance monitoring service that helps you gain insights into the availability, performance, and usage of your applications. It allows you to track and analyze telemetry data from vThunder. With application insights, you can detect and diagnose performance issues, identify trends, and optimize application performance to deliver better user experiences.
 "appInsightsName": {
      "value": "vth-vmss-app-insights"
     },
Enable Accelerated Networking
Specify 'true' to enable low latency and high throughput on the NICs. For more information, see Accelerated Networking.
 "Enable Accelerated Networking": {
      "value": false
    },
NOTE: By default, accelerated networking is disabled for all type of compute instances and it can be enabled for the selected compute instances. For the supported compute instances, see Supported VM Sizes. Enable IP Forwarding
Specify 'true' to allow the virtual machine to forward the network traffic between networks in order to improve the network performance. This high-performance forwarded path bypasses the host from the usual data path, thus, reducing latency, jitter, and CPU utilization when using the most demanding network workloads on the supported VM types. For more information, see IP Forwarding.
 "Enable IP Forwarding": {
      "value": false
    }
NOTE: By default, IP forwarding is disabled. - Verify if all the configurations in the PS_TMPL_3NIC_NVM_VMSS_PARAM.json file are correct and then save the changes.
- From the Start menu, open PowerShell and navigate to the folder where you have downloaded the PowerShell template.
-
Run the following command to create a resource group in Azure:
PS C:\Users\TestUser\Templates> az group create --name <resource_group_name> --location "<location_name>"
Example:
PS C:\Users\TestUser\Templates> az group create --name vth-rg1 --location "south central us"
{ "id": "/subscriptions/xxxxxxxx-xxxx-xxxx-xxxx-xxxxxxxxxxxx/resourceGroups/vth-rg1", "location": "southcentralus", "managedBy": null, "name": "vth-rg1", "properties": { "provisioningState": "Succeeded" }, "tags": null, "type": "Microsoft.Resources/resourceGroups" } -
Run the following command to create a deployment group in Azure.
PS C:\Users\TestUser\Templates> az deployment group create -g <resource_group_name> --template-file <template_name> --parameters <param_template_name>
Example:
PS C:\Users\TestUser\Templates> az deployment group create -g vth-rg1 --template-file PS_TMPL_3NIC_NVM_VMSS_1.json --parameters PS_TMPL_3NIC_NVM_VMSS_PARAM.jsonA resource group is created.
Here,vth-rg1resource group is created.Figure 79 : Resource listing under resource group

- Verify if the runbooks are created:
- From Home, navigate to Azure services > Automation Accounts ><automation_account_name>.
The selected automation account - Overview window is displayed.
Figure 80 : Selected automation account - Overview window

- Click Runbooks from the left Process Automation panel.
The selected automation account - Jobs window is displayed.Figure 81 : Selected automation account - Runbooks window

Here, the runbooks created are Change-Password-Config, GLM-Config, GLM-Revoke-Config, Master-Runbook, SLB-Config, and SSL-Config.
- From Home, navigate to Azure services > Automation Accounts ><automation_account_name>.
- Verify the instance count:
- From Home, navigate to Azure services > Virtual machine scale set > <vmss_name>.
The selected VMSS - Overview window is displayed. Here, the VMSS name is
vth-vmss.Figure 82 : Virtual machine scale set - Overview window

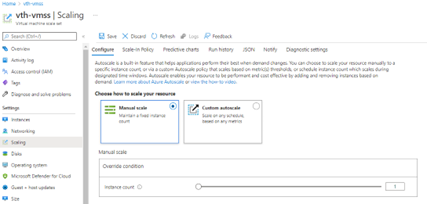
- Click Scaling from the left Settings panel.
The selected VMSS - Scaling window is displayed.Figure 83 : Virtual machine scale set - Scaling window - Configure tab

- Verify the configured instance count.
If the instance gets deleted either manually or automatically, VMSS creates a new instance.
- From Home, navigate to Azure services > Virtual machine scale set > <vmss_name>.
- Verify if the LB resources are created:
- From Home, navigate to Azure services > Load balancer > <lb_name>.
The selected LB - Overview window is displayed. Here, the LB name isvth-lb. - Click Frontend IP configuration from the left Settings panel to verify if the LB frontend IP is created.
Figure 84 : Selected Frontend IP configuration window

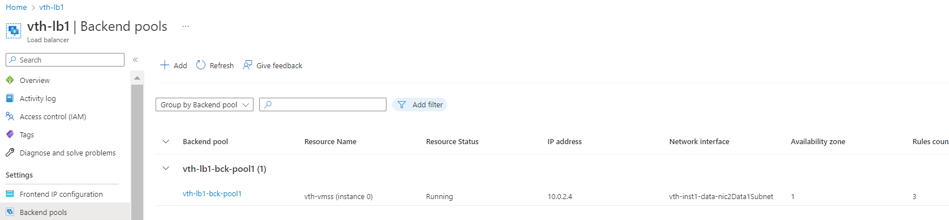
- Click Backend pools from the left Settings panel to verify if the backend pools are created.
Figure 85 : Selected Backendpools window

- Click Health probes from the left Settings panel to verify if the health probes are created.
Figure 86 : Selected Health Probes window

- Click Load balancing rules from the left Settings panel to verify if the load balancing rules are created.
Figure 87 : Selected load balancing rules window

Here, the load balancing rules are rulePort80, rulePort443, and rulePort53.
- From Home, navigate to Azure services > Load balancer > <lb_name>.
- Verify if the storage account container is created:
- From Home, navigate to Azure services > Storage account > <storage_account_name>.
The selected storage account - Overview window is displayed. Here, the storage account name isvthunderstorage. - Click Containers from the left Data storage panel.
The selected storage account - Containers window is displayed.Figure 88 : Selected storage account - Containers window

Here, the storage account container is
ssl.
- From Home, navigate to Azure services > Storage account > <storage_account_name>.