Create Thunder Virtual Machines
The A10-vThunder-3NIC-2VM-PVTVIP template is used to create two Thunder virtual machines with three network interface cards each and configure the data-in network interface card with Private IP on VIP. This template is deployed using Azure CLI.
Before deploying this template, it is recommended to review the Prerequisites.
vThunder instances should have the same versions; otherwise, traffic flow will be disrupted.
To deploy the A10-vThunder-3NIC-2VM-PVTVIP template using Azure CLI commands, perform the following steps:
-
Download A10-vThunder-3NIC-2VM-PVTVIP template.
NOTE: This template contains pre-populated default values that can be modified as required and it does not create new virtual network, network security group, subnets, and Public IP. - From Windows Explorer, navigate to the folder where you have downloaded the
- Open the
-
Configure the following parameters as appropriate:
Table 4 : JSON Parameters Resource Name
Description
vThunder instance credentials
Enter the default admin credentials to provision the vThunder instance. Once the device is provisioned, vThunder auto-deletes all the users except the default user.
    "adminUsername":{
        "value":"vth-user"
     },
     "adminPassword":{
        "value":"vth-Password"
     },
NOTE: This is a mandatory step during VM creation. Once the device is provisioned, vThunder auto-deletes all users except the default user. Virtual Network
Specify an existing virtual network name for vThunder.
   "virtual_network": {
      "value": "<existing virtual network name>"
    },
Virtual Machines
Specify a virtual machine name for each of the two vThunder instances.
   "vmName_vthunder1": {
      "value": "vth-inst1"
    },
    "vmName_vthunder2": {
      "value": "vth-inst2"
    },
Virtual Machine Zones
Specify an availability zone in which to deploy your virtual machine. If you have an existing Public IP, then it should be available in the same availability zone as the virtual machine.
    "Virtual_Machine1_Zone": {
      "value": "1"
    },
    "Virtual_Machine2_Zone": {
      "value": "1"
    },
Size
Specify a suitable size for the vThunder instance that supports at least 3 NICs. For VM sizes, see Supported VM Sizes.
   "vmSize": {
      "value": "Standard_D8s_v3"
    },
Image
Specify the desired vThunder Image name and Product name from the Azure Marketplace.
   "vThunderImage": {
      "value":"a10-vthunder-adc-601-byol"
    },
"publisherName": { "value": "a10networks" },"productName": { "value": "a10-vthunder-adc-521" },NOTE: Do NOT change the publisher name. Network Interface Cards
Specify a unique network interface card for management, datain, and dataout traffic.
   "nic1Name_vm1": {
      "value": "vth-inst1-mgmt-nic1"
    },
   "nic1Name_vm2": {
      "value": "vth-inst2-mgmt-nic1"
    },
"nic2Name_vm1": { "value": "vth-inst1-data-nic2" }, "nic3Name_vm1": { "value": "vth-inst1-data-nic3" },
"nic2Name_vm2": { "value": "vth-inst2-data-nic2" }, "nic3Name_vm2": { "value": "vth-inst2-data-nic3" },Management Subnet
Specify an existing subnet name that is available within the selected virtual network for inbound management traffic.
   "subnet1Name": {
      "value": "<existing mgmt_subnet name>"
    },
Data Subnet
Specify an existing subnet name that is available within a selected virtual network for inbound and outbound data traffic.
    "subnet2Name": {
      "value": "<existing data1_subnet name>"
    },
    "subnet3Name": {
      "value": "<existing data2_subnet name>"
    },
Network Security Groups
Specify a unique network interface card for management, datain, and dataout traffic.
   "networkSecurityGroupName_vm1": {
      "value": "<existing vm1 network security group>"
    },
    "networkSecurityGroupName_vm2": {
      "value": "<existing vm2 network security group>"
    },
Public IP address
Specify the existing Public IP addresses for management traffic.
   "PublicIPName_vm1": {
      "value":"<existing vm1 publicipaddress name>"
    },
    "PublicIPName_vm2": {
      "value":"<existing vm2 publicipaddress name>"
    },
Enable Accelerated Networking
Specify 'true' to enable low latency and high throughput on the NICs. For more information, see Accelerated Networking.
   "enableAcceleratedNetworking": {
      "value": false
    },
NOTE: By default, accelerated networking is disabled for all type of compute instances and it can be enabled for the selected compute instances. For the supported compute instances, see Supported VM Sizes. Enable IP Forwarding
Specify 'true' to allow the virtual machine to forward the network traffic between networks in order to improve the network performance. This high-performance forwarded path bypasses the host from the usual data path, thus, reducing latency, jitter, and CPU utilization when using the most demanding network workloads on the supported VM types. For more information, see IP Forwarding.
   "enableIPForwarding": {
    "value": false
    },
NOTE: By default, IP forwarding is disabled. Resource Group
Specify the name of an existing resource group under which the virtual network, network security group, and subnets are already created.
"ResourceGroupName": { "value": "<existing vnet nsg publicIP resourcegroup>" } - Verify if all the configurations in the
- From the Start menu, open PowerShell and navigate to the folder where you have downloaded the
-
Run the following command to create an Azure resource group:
PS C:\Users\TestUser\Templates> az group create --name <resource_group_name> --location "<location_name>"
Example:
PS C:\Users\TestUser\Templates> az group create --name vth-rg1 --location "south central us"
{ "id": "/subscriptions/xxxxxxxx-xxxx-xxxx-xxxx-xxxxxxxxxxxx/resourceGroups/vth-rg1", "location": "southcentralus", "managedBy": null, "name": "vth-rg1", "properties": { "provisioningState": "Succeeded" }, "tags": null, "type": "Microsoft.Resources/resourceGroups" } -
Run the following command to create an Azure deployment group.
PS C:\Users\TestUser\Templates> az deployment group create -g <resource_group_name> --template-file <template_name> --parameters <param_template_name>
Example:
PS C:\Users\TestUser\Templates> az deployment group create -g vth-rg1 --template-file
Here,
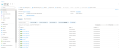
vth-rg1resource group is created.NOTE: The resource group of the deployed vThunder instance and it’s resources can be same or different from the resource group of virtual network, NSG, and public IP. - Verify if all the above listed resources are created under Home > Azure services > Resource Groups > <resource_group_name>.
Figure 24 : Resource listing under resource group