Create Thunder Virtual Machine
The A10-vThunder-2NIC-1VM template is used to create a Thunder virtual machine with two network interface cards.
Before deploying this template, it is recommended to review the Prerequisites.
There are two ways to deploy this template:
To deploy the A10-vThunder-2NIC-1VM template using Azure Portal Console, perform the following steps:
-
Download A10-vThunder-2NIC-1VM template.
-
From the Azure Portal > Azure services, click Deploy a custom template.
Figure 2 : Azure services

-
Under the Custom deployment window > Select a template tab, click Build your own template in the editor.
Figure 3 : Custom deployment window

-
From the Edit template window, perform either of the following step:
- Click Load file and browse to the folder where you have downloaded the ARM template. Select ARM_TMPL_2NIC_1VM.json to upload.
- From Windows Explorer, navigate to the folder where you have downloaded the ARM template. Copy ARM_TMPL_2NIC_1VM.json content and paste it in the editor.
Figure 4 : Edit template window

-
Click Save.
The Custom deployment window is displayed with the template parameters and default values.
Figure 5 : Custom deployment template

-
Select an existing or create a new Resource group under which you want to deploy the custom template resources.
NOTE: Hover i for description of each corresponding parameter. -
Update the default values and also provide the values in the empty fields as appropriate in the Instance details section shown in Figure 5.
NOTE: Use a suitable VM size that supports at least two NICs. For VM sizes, Supported VM Sizes. -
Click Review+create.
The validation appears.
-
Click Create.
NOTE: It may take the system several minutes to display your resources. -
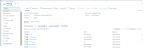
Verify if all the above listed resources are created under Home > Azure services > Resource Groups > <resource_group_name>.
Figure 6 : Resource listing under resource group


To deploy the A10-vThunder-2NIC-1VM template using Azure CLI commands, perform the following steps:
-
Download A10-vThunder-2NIC-1VM template.
NOTE: This template contains pre-populated default values that can be modified as required and it does not create new virtual network, network security group, subnets, and Public IP. - From Windows Explorer, navigate to the folder where you have downloaded the ARM template.
- Open the ARM_TMPL_2NIC_1VM_PARAM.json with a text editor.
-
Configure the following parameters as appropriate:
Table 3 : JSON Parameters Resource Name
Description
Virtual Machine
Specify a virtual machine name for vThunder.
    "Virtual Machine Name": {
      "value": "vth-inst1"
    },
Size
Specify a suitable size for the vThunder instance that supports at least 2 NICs. For VM sizes, see Supported VM Sizes.
    "Size": {
      "value": "Standard_D8s_v3"
    },
Image
Specify the desired vThunder Image name and Product name from the Azure Marketplace.
    "Image": {
      "value":"a10-vthunder-adc-601-byol"
    },
"Publisher": { "value": "a10networks" },"Product": { "value": "a10-vthunder-adc-521" },NOTE: Do NOT change the publisher name. Resource Group
Specify the name of an existing resource group under which the virtual network, network security group, and subnets are already created.
    "ResourceGroup": {
      "value": "<existing VN NSG ResourceGroupName>"
    },
Virtual Network
Specify an existing virtual network name for vThunder.
    "Virtual Network": {
      "value": "<existing virtual network name>"
    },
Management Subnet
Specify an existing subnet name that is available within the selected virtual network for inbound management traffic.
    "SubnetManagement": {
      "value": "<existing subnet-mgmt name>"
    },
Data Subnet
Specify an existing subnet name that is available within a selected virtual network for inbound and outbound data traffic.
    "SubnetData": {
      "value": "<existing subnet-data name>"
    },
Network Interface Cards
Specify a unique network interface card for management and data traffic.
    "NIC Management": {
      "value": "vth-inst1-mgmt-nic"
    },
"NIC Data": { "value": "vth-inst1-data-nic" },Public IP address
Specify an existing Public IP address for management traffic.
    "Public IP Name": {
      "value": "<existing Public IP Name>"
    },
Network Security Group
Specify an existing network security group name for all the NICs.
    "Network Security Group": {
      "value": "<existing Network Security Group>"
    },
Enable Accelerated Networking
Specify 'true' to enable low latency and high throughput on the NICs. For more information, see Accelerated Networking.
    "Enable Accelerated Networking": {
      "value": false
    },
NOTE: By default, accelerated networking is disabled for all type of compute instances and it can be enabled only for certain compute instances. For the compatible compute instances, see Supported VM Sizes. Enable IP Forwarding
Specify 'true' to allow the virtual machine to forward the network traffic between networks to improve the network performance. This high-performance forwarded path bypasses the host from the usual data path, thus, reducing latency, jitter, and CPU utilization when using the most demanding network workloads on the supported VM types. For more information, see IP Forwarding.
    "Enable IP Forwarding": {
      "value": false
    }
NOTE: By default, IP forwarding is disabled. - Verify if all the configurations in the ARM_TMPL_2NIC_1VM_PARAM.json file are correct and then save the changes.
- From Start menu, open PowerShell and navigate to the folder where you have downloaded the ARM template.
-
Run the following command to create an Azure resource group:
PS C:\Users\TestUser\Templates> az group create --name <resource_group_name> --location "<location_name>"
Example:
PS C:\Users\TestUser\Templates> az group create --name vth-rg1 --location "south central us"
{ "id": "/subscriptions/xxxxxxxx-xxxx-xxxx-xxxx-xxxxxxxxxxxx/resourceGroups/vth-rg1", "location": "southcentralus", "managedBy": null, "name": "vth-rg1", "properties": { "provisioningState": "Succeeded" }, "tags": null, "type": "Microsoft.Resources/resourceGroups" } -
Run the following command to create an Azure deployment group.
PS C:\Users\TestUser\Templates> az deployment group create -g <resource_group_name> --template-file <template_name> --parameters <param_template_name>
Example:
PS C:\Users\TestUser\Templates> az deployment group create -g vth-rg1 --template-file ARM_TMPL_2NIC_1VM.json --parameters ARM_TMPL_2NIC_1VM_PARAM.json
Here,
vth-rg1resource group is created.NOTE: The resource group of the deployed vThunder instance and it’s resources can be same or different from the resource group of virtual network, NSG, and Public IP. - Verify if all the above listed resources are created under Home > Azure services > Resource Groups > <resource_group_name>.
Figure 7 : Resource listing under resource group